Calibration
Quick start guide
1. Individual camera calibration
The first step in any analysis is to perform a camera calibration.
Select New in the Calibration Library.
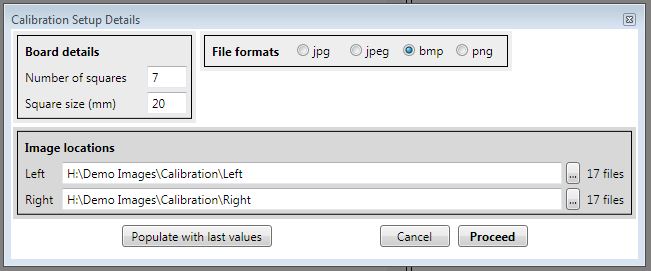
Enter the relevant board details for your specific analysis. The values for the sample images are given in the above screenshot.
Click Proceed to continue.
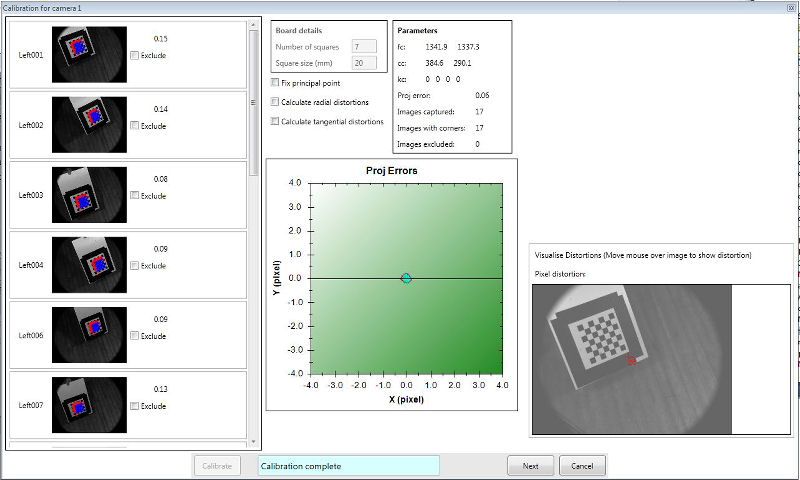
A camera calibration window will appear. The calibration images are shown in the left hand side of the window. Click 'Calibrate' and wait for the operation to complete (this may take over a minute if you have got a large number of images). The calibration window is shown above.
Notes:
-
If the checkerboard is not completely visible in the image then click 'Exclude'
on that image.
-
The number alongside each calibration image is the RMS pixel error
for the reconstruction of the intersection points on the checkerboard.
The overall projection error is shown in the 'Parameters' table.
If any image has a pixel error which is considerably larger (as a
guide, double the overall projection error), you should consider
excluding that image.
- The image in the bottom-right of the screen should show a circle
(geometrical centre of the image) and a crosshair (calculated
principal point of the camera). For most modern cameras/lenses the
two points should coincide very closely. If they do not, consider
selecting Fix principal point and running the
calibration again.
- If lens distortions are obvious, or suspected, it is worth
running a calibration with Calculate radial distortions
selected. If the overall projection error is not reduced
significantly then unselect this option. Furthermore, move the
mouse over the image in the bottom-right of the screen and this will
display the calculated distortion (in pixels) at any point in the
image. If the maximum distortion is small (as a guide, less
than 2% of the image dimension) then it is advisable to unselect
Calculate radial distortions.
- In general, the option Calculate tangential distortions
should not be used. This option is generally only useful if
the longitudinal axis of the lens is badly aligned to the camera
sensor.
- The graph in the centre of the window shows the pixel error of
each intersection point on the checkerboard.
- To view a larger version of any image, click on it and the image will be shown in the top-right of the window.
When you are happy with the calibration, click Next to calibrate the right camera. Repeat the steps above for that camera.
For a description of the camera parameters have a look at the Jean-Yves Bouguet's camera calibration site.
2. Stereo camera calibration
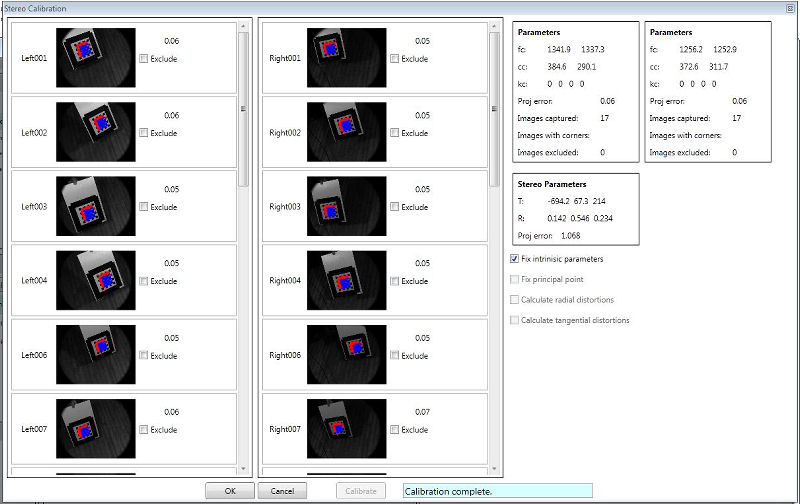
On the stereo calibration window, leave the default settings and click Calibrate. Any excluding images from the individual calibration stage will also be excluding in this stage (along with their associated image in the other camera view).
IMPORTANT NOTE:
The pairs of images in both cameras must be synchronised. If they are not, the solver will
either fail(crash) or give the wrong stereo
model.
Notes:
-
The reprojection error is the RMS of the total reprojection error
for all the points (see
OpenCV for full description). The algorithm minimises this
value to find the optimal solution.
-
If the Fix intrinsic parameters is selected,
Check3D will use the same camera model as obtained in the
individual calibration stage. This is the most stable method.
You may wish to deselect this option. This allows the stereo
calibration algorithm to recompute the intrinsic camera parameters
to minimise the stereo reprojection error.
3. Specify origin system
This stage can be skipped if you do not want to specify a local origin system for the digitised data.
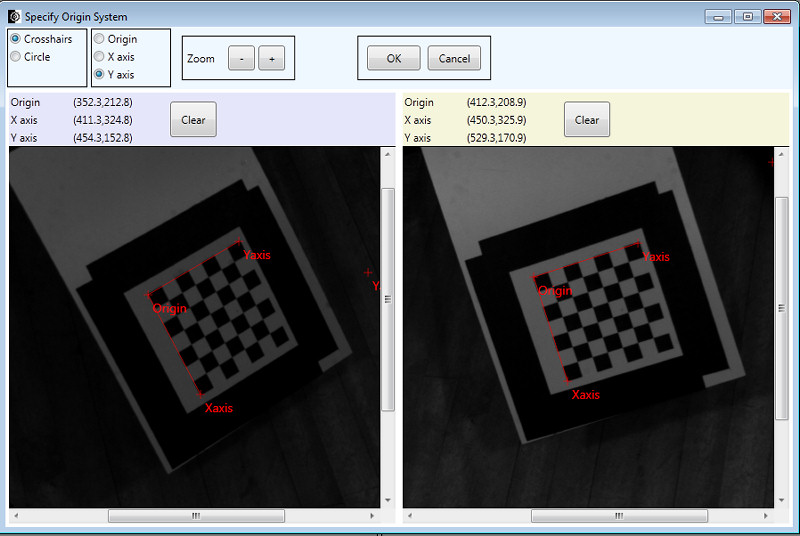
- To perform this step, two images (one for each camera) of an origin system must be used. This can be any suitable object, but the easiest item to use is the checkerboard.
- Drop the images onto the viewing panes (from a file explorer window).
- Click on the origin, a point on the X axis and a point on the Y axis. (MUST BE SAME POINT IN BOTH IMAGES)
This completes the specification of the origin system, and any coordinate obtained using this calibration will be referenced to this origin. The stereo calibration file will be saved in the '..\MyDocuments\Check3D\Calibration' folder, and listed in the Calibration Library in Check3D. The uniqueID is used to identify the calibration and is the same as the filename.
Calibrations can be exported/imported so that they can be used on other computers.